This short guide will take you through the configuration settings of your Cisco phone.
Step 1 - Getting your IP address
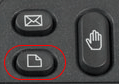
Press on the little paper button. Then press 2 and you will see your IP address.
Step 2 - Enter IP address in browser
Now enter the IP in your computer's browser: http://<enter IP address here>
Step 3 - Go to Admin Login
In the top right corner you find a link to Admin Login. After you entered this page, choose the tab Ext 1
Step 4 - Adjust settings
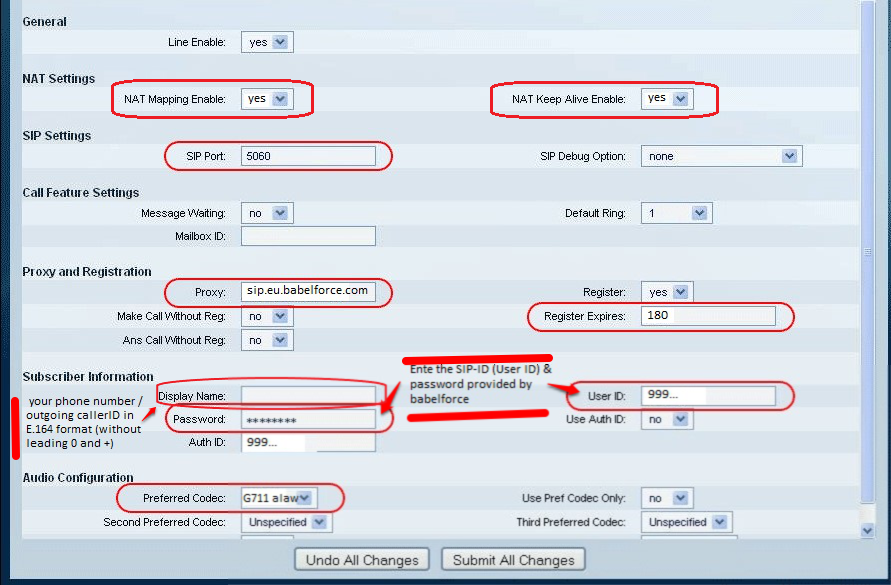
This step simply requires you to change a few settings.
NAT Settings
- NAT Mapping Enabled: Yes
- NAT Keep Alive Enabled: Yes
SIP Settings:
- SIP Port: 5050
Proxy and Registration
- Proxy: sip.eu.babelforce.com (proxy varies by territory)
- Register Expires: 180
Subscriber Information
- Display Name: fill in the phone number you want to have displayed on the device of the person you are calling, this could be for example one of your inbound phone numbers that you got from babelforce
- User ID: Fill in the Agent ID number (SIP ID) provided by babelforce
- Auth ID: Fill in also the Agent ID number (SIP ID) provided by babelforce
- Password: Fill in the password provided by babelforce
Step 5 - STUN settings
In the top right corner, go to Advanced and in the SIP tab switch to STUN settings.
- Make sure STUN is enabled.
- Enter the babelforce STUN server: stun.babelforce.com

Comments
0 comments
Please sign in to leave a comment.